Featured

HOWTO: Getting Started with BulletProof FTP Server

Thank you for your interest in BulletProof FTP Server.

Below is a list of HOWTO articles that have been written over the years to help customers in getting up and running with BulletProof FTP Server.
Note: Some of the screen-shots show older versions of the software. The UI hasn’t changed much between different versions, but you might find some of the buttons labeled differently than what appears.

  • Download, Install and Adding First User
  • Opening Your Firewall
  • Licensing
  • Upgrading
  • Windows System Service
  •  

    Download, Install and Adding First User

    HOWTO: Downloading BPFTP Server 2010
    http://blog.builtbp.com/2010/09/howto-downloading-bpftp-server-2010/

    HOWTO: Installing BPFTP Server 2010
    http://blog.builtbp.com/2010/09/howto-installing-bpftp-server-2010/

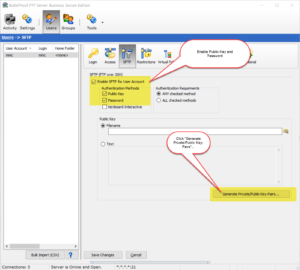
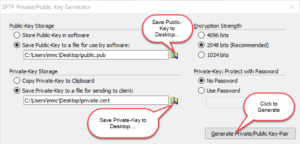
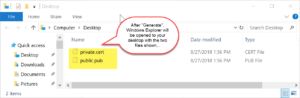
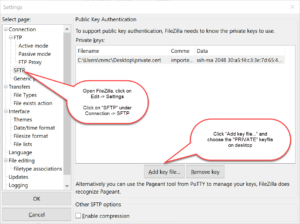
    HOWTO: Adding a User
    http://blog.builtbp.com/2010/09/howto-adding-a-user/


    Opening Your Firewall

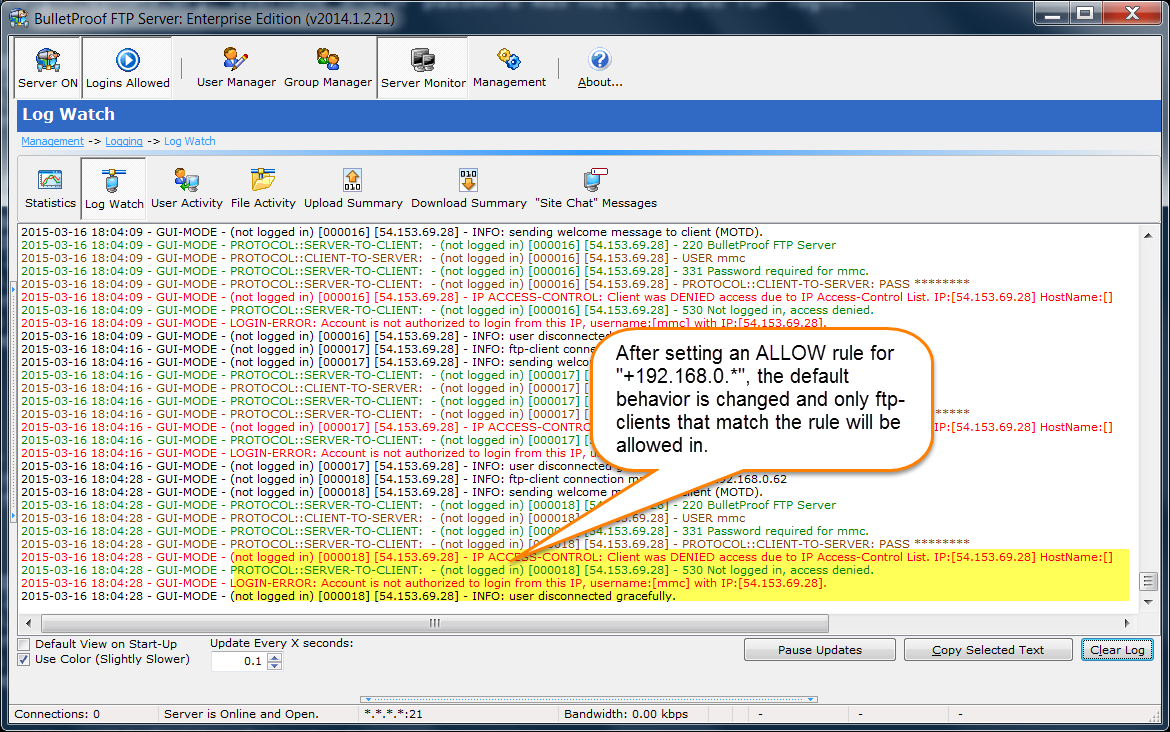
    It’s VERY common that people think only one-port is needed for ftp (default: tcp/ip 21). However, this is not true.

    FTP requires at least two ports, one for the control-port (used to login and issue commands, default tcp/ip 21) and a data-port (default tcp/ip 30000 to 30100). One data-port is needed for every concurrent data-connection, for this reason we suggest using a range of 100 ports which will handle most needs.

    HOWTO: Windows Firewall and BPFTP Server 2011
    http://blog.builtbp.com/2011/06/windows-firewall-and-bulletproof-ftp-server/

    HOWTO: Windows Firewall
    http://blog.builtbp.com/2010/09/howto-windows-firewall/

    HOWTO: Setting up NAT/Passive/Firewall Support
    http://blog.builtbp.com/2010/09/howto-setting-up-natpassivefirewall-support/


    Licensing

    HOWTO: Enter Your Subscription-Code
    http://blog.builtbp.com/2013/05/howto-enter-your-subscription-code/

    HOWTO: Purchase an Upgrade to your License
    http://blog.builtbp.com/2014/02/howto-purchase-an-upgrade-to-your-license/

    HOWTO: Remove Your License-Code
    http://blog.builtbp.com/2013/05/howto-remove-your-license-code/


    Upgrading

    FAQ: Can I Upgrade and retain all my Users, Groups and Settings?
    http://blog.builtbp.com/2011/12/faq-can-i-upgrade-and-retail-all-my-users-groups-and-settings/

    FAQ: Where does BPFTP Server store the Users, Groups and Settings?
    http://blog.builtbp.com/2011/12/faq-where-does-bpftp-server-store-the-users-groups-and-settings/

    HOWTO: Overridding the Storage-Path for Settings, Users and Groups
    http://blog.builtbp.com/2011/10/howto-override-storage-path-for-settings-users-and-groups/


    Windows System Service

    HOWTO: Windows System-Service
    http://blog.builtbp.com/2011/09/howto-windows-system-service/


    SERVICE: Stops Responding or 100% CPU

    BPFTP Server has the ability to operate as a Windows System Service aka SERVICE-MODE (HOWTO).

    This is essentially, the same as the normal GUI-MODE that you are used to seeing when you login to the computer and run the application, however it’s running under Session-0 (Windows System Service) and all GUI operations are hidden. This can make it more difficult to diagnose issues, as the software can only respond via the Windows Event Viewer (start, view) and the BPFTP Server Log (Settings -> Logging -> Settings -> “Saved Log-File Location”).

    But, why is it not responding or is stuck at 100% ?!?!
    I don’t immediately know the answer to this, the software doesn’t have any known problems which would cause this.. so we need to look at the environment, conditions and logs coming back from the software. It’s possible that there’s a network share that isn’t responding (the most likely issue), it’s also possible you’ve encountered an issue, in either case, we need more information…

    When encountering a problem with running in SERVICE-MODE, it’s important to start breaking down the problem:

  • Look at the Windows System Service under “Windows Logs” -> “Application|System” -> Source=”BulletProof FTP Server”
  • View the BPFTP Server log file, make sure the software is terminated, so you see the current log. BPFTP Server -> Settings -> Logging -> Settings
  • Make sure you have the current version of the software, BPFTP Server -> Tools -> Check for Update and/or visit the web-site/changelog
  • Can you reproduce the error? Try running the software in DEBUG-MODE and send us the *.csl/*.zip. Don’t just email a giant log file… In order for us to find the issue, please perform the operation that reproduces the error, the date/time (so we can find it) and the symptoms of the issue.
  • LASTLY, and MOST IMPORTANTLY… run the software in the GUI mode, not the SERVICE mode. This will allow the UI to communicate with the desktop, so that you can see what’s going on. This is an absolute must, in order to discover the source of the issue. It doesn’t mean you’ll never be able to run SERVICE mode, only during the testing phase.
  • HOWTO: Enabled SFTP for User Account

    As of version 2018.0.0.40, BulletProof FTP Server supports SFTP aka FTP over SSH in the Secure Edition of the product.

    Enabling SFTP for a given User-Account simply requires the toggling of the feature for the user-account, and specifying the authentication method. The two methods of authenticating are via Public-Key, Password or both. Optionally, you can specify that the authentication must happen via the keyboard.

    Turn on SFTP for User-Account
    (click for full-size)
    Optional: Enable Password Authentication
    (click for full-size)
    Optional: Enable Public-Key Authentication (Recommended)
    (click for full-size)

    HOWTO: Enabled SFTP for FTP Server

    As of version 2018.0.0.40, BulletProof FTP Server supports SFTP aka FTP over SSH in the Secure Edition of the product.

    Enabling SFTP is very simple and only requires a Private-Key. The Private-Key can be loaded via a file or text which has been copy/paste’d into the software (NOTE: text keys will be stored encrypted in the software).

    Enabled SFTP for the FTP Server
    Enable SFTP for the FTP Server (click for full-size)
    Generate Private-Key (click for full-size)
    Assigned Private-Key (click for full-size)

    HOWTO: Enter License-Code from Command-Line

    In some Windows configurations, it might be necessary to enter the license-code via the command-line. Specifically, in Windows Server where “Internet Explorer Enhanced Security” is turned on (More Info: here, here, here, here and here). When IE ESC is turned on, you’ll need to turn it off; this is because the dialog-box that appears for entering your registration code uses the IE WebKit and as a result the links won’t work correctly.

    However, you don’t have to disable IE ESC, you can also enter it via the command-line:


    1) Start -> Run -> "cmd" (enter)
    2) c:
    3) cd "C:\Program Files (x86)\BulletProof FTP Server"
    4) Working with a license-code that looks like...

    Name:John Doe
    Key:00012X-8d7DJF2-6F323F-JVQBUA-8DJF3F-28RR4E-02Z6PC-ZXG37G-QBFDH2-NPDPBM-9XS9D9-MPH56G

    Enter the following command:

    bpftpserver.exe QUIETREGISTER John Doe 00012X-8d7DJF2-6F323F-JVQBUA-8DJF3F-28RR4E-02Z6PC-ZXG37G-QBFDH2-NPDPBM-9XS9D9-MPH56G

    FEATURE: IP-Based Access-Control: Server Wide

    - Navigate to Management -> Security -> IP Access Control-Lists - Right-click and choose "Add IP/ACL" PLEASE NOTE: All rules should be added as a DENY rule ("-" minus) sign. Entering a ALLOW rule ("+" plus) will override the default rule of "+*.*.*.*" and turn IP/ACL into whitelist only, where all IPs are rejected unless an ALLOW rule is created.
    – Navigate to Management -> Security -> IP Access Control-Lists
    – Right-click and choose “Add IP/ACL”
    PLEASE NOTE: All rules should be added as a DENY rule (“-” minus) sign. Entering a ALLOW rule (“+” plus) will override the default rule of “+*.*.*.*” and turn IP/ACL into whitelist only, where all IPs are rejected unless an ALLOW rule is created.
    Enter the IP Address to be banned. Please note that the "Refuse IP Address Access" should be chosen. PLEASE NOTE: All rules should be added as a DENY rule ("-" minus) sign. Entering a ALLOW rule ("+" plus) will override the default rule of "+*.*.*.*" and turn IP/ACL into whitelist only, where all IPs are rejected unless an ALLOW rule is created.
    Enter the IP Address to be banned. Please note that the “Refuse IP Address Access” should be chosen.
    PLEASE NOTE: All rules should be added as a DENY rule (“-” minus) sign. Entering a ALLOW rule (“+” plus) will override the default rule of “+*.*.*.*” and turn IP/ACL into whitelist only, where all IPs are rejected unless an ALLOW rule is created.
    - Navigate to Server Monitor -> Log Watch In this example, you'll see the DENY rule being made for "-54.153.69.28" and you'll see the ftp-client disconnect and then attempt to reconnect again, only to be refused access.
    – Navigate to Server Monitor -> Log Watch
    In this example, you’ll see the DENY rule being made for “-54.153.69.28” and you’ll see the ftp-client disconnect and then attempt to reconnect again, only to be refused access.

    FEATURE: IP Based Access-Control for Users/Groups

    - Navigate to User/Group Manager -> Edit User/Group -> Restrictions - Right-click and choose "Add IP/ACL" PLEASE NOTE: All rules should be added as a DENY rule ("-" minus) sign. Entering a ALLOW rule ("+" plus) will override the default rule of "+*.*.*.*" and turn IP/ACL into whitelist only, where all IPs are rejected unless an ALLOW rule is created.
    – Navigate to User/Group Manager -> Edit User/Group -> Restrictions
    – Right-click and choose “Add IP/ACL”
    PLEASE NOTE: All rules should be added as a DENY rule (“-” minus) sign. Entering a ALLOW rule (“+” plus) will override the default rule of “+*.*.*.*” and turn IP/ACL into whitelist only, where all IPs are rejected unless an ALLOW rule is created.
    Enter the IP Address to be banned. Please note that the "Allow IP Address Access" should be chosen, in order to restrict a user|group to a specific IP Address (aka whitelist) PLEASE NOTE: All rules should be added as a DENY rule ("-" minus) sign. Entering a ALLOW rule ("+" plus) will override the default rule of "+*.*.*.*" and turn IP/ACL into whitelist only, where all IPs are rejected unless an ALLOW rule is created.
    Enter the IP Address to be banned. Please note that the “Allow IP Address Access” should be chosen, in order to restrict a user|group to a specific IP Address (aka whitelist)
    PLEASE NOTE: All rules should be added as a DENY rule (“-” minus) sign. Entering a ALLOW rule (“+” plus) will override the default rule of “+*.*.*.*” and turn IP/ACL into whitelist only, where all IPs are rejected unless an ALLOW rule is created.
    - Navigate to Server Monitor -> Log Watch In this example, you'll see the ftp-client from "-54.153.69.28" is denied. This is because the IP/ACL was converted to a "whitelist" with a single ALLOW rule and "+192.168.0.*" does not match the incoming ftp-client.
    – Navigate to Server Monitor -> Log Watch
    In this example, you’ll see the ftp-client from “-54.153.69.28” is denied. This is because the IP/ACL was converted to a “whitelist” with a single ALLOW rule and “+192.168.0.*” does not match the incoming ftp-client.