HOWTO: Add Anonymous ftp-user to BPFTP Server

1) Switch to "User Manager" 2) Click "Add User" 3) Enter the name for the account as "anonymous"
1) Switch to “User Manager”
2) Click “Add User”
3) Enter the name for the account as “anonymous”
1) Switch to "Login" 2) Turn OFF the requirement for a "Password" for the account...
1) Switch to “Login”
2) Turn OFF the requirement for a “Password” for the account…
1) Switch to "Access" 2) Right-Click in the empty part of the window. 3) Click Add.
1) Switch to “Access”
2) Right-Click in the empty part of the window.
3) Click Add.
1) Choose the directory you want the anonymous user to access. Recommend: c:\ftp\anonymous
1) Choose the directory you want the anonymous user to access.
Recommend: c:\ftp\anonymous
1) It's recommended that the anonymous user have the following rights to only allow the "uploading" of files to your ftp-server. TIP: This will keep people from using your ftp-server as a "dump-site" for trading of nefarious files. 2) Click "Save and Close"
1) It’s recommended that the anonymous user have the following rights to only allow the “uploading” of files to your ftp-server.
TIP: This will keep people from using your ftp-server as a “dump-site” for trading of nefarious files.
2) Click “Save and Close”

KNOWN PROBLEM: Slow Startup after Several Weeks of Heavy Usage

KNOWN PROBLEM: Slow Startup after Several Weeks of Heavy Usage

In order to provide information on Server Monitor -> Files Uploaded/Downloaded, the software writes entries into secondary files stored in the Storage-Location directory. These files contain one-line per file uploaded/downloaded and as the usage of the program increases, these files get bigger and bigger. Start-Up of the program will be effected as these files increase in size and the time to load the file into memory increases (and the footprint in memory increases).

Server Monitor -> Files Downloaded/Uploaded

To resolve this problem, it’s necessary to manually archive these files to another location; this will “reset” the statistics found in Server Monitor -> Files Uploaded/Downloaded.

You can manually archive these files:
1) Closing BulletProof FTP Server and ensure the SERVICE is not current running/active
2) Use My Computer or a Command-Prompt and navigate to the Storage-Location.
3) Locate the files named below and move them to some archive directory of your choosing (or delete them):

bpftpserver-common-downloads.ini
bpftpserver-common-uploads.ini

4) Start BulletProof FTP Server

NOTE: In a later version, this will be resolved with a re-organization and re-write of this function in order to save the information in a way that doesn’t affect performance.

HOWTO: Enable Debug-Mode

This graphics details a list of 4 steps used to toggle the "DEBUG-MODE" in BulletProof FTP Server.
This graphics details a list of 4 steps used to toggle the “DEBUG-MODE” in BulletProof FTP Server. Using the DEBUG-MODE in BulletProof FTP Server will cause the program to write extensive debugging information to a file on the desktop. This file can then be emailed to us, along with a description of the exact steps used to produce the error. Using this information, we can trace through all of the logic in the program in order to identify the problem and provide a solution.

BPFTP Server: Update Available (Click Here); “Nothing Happens!”

When I click it, NOTHING HAPPENS?!?!?

Whenever there’s a new version available, BPFTP Server will display “Update Available (CLICK HERE)” in a yellow-box at the top of “Server Info”.

However, in versions prior to and including 2013.1.0.5, this function was inadvertently broken; as a result, please go to our website to download the update. This functionality is restored and working in 2013.1.0.6 and later.

FEATURE: Bulk Import CSV

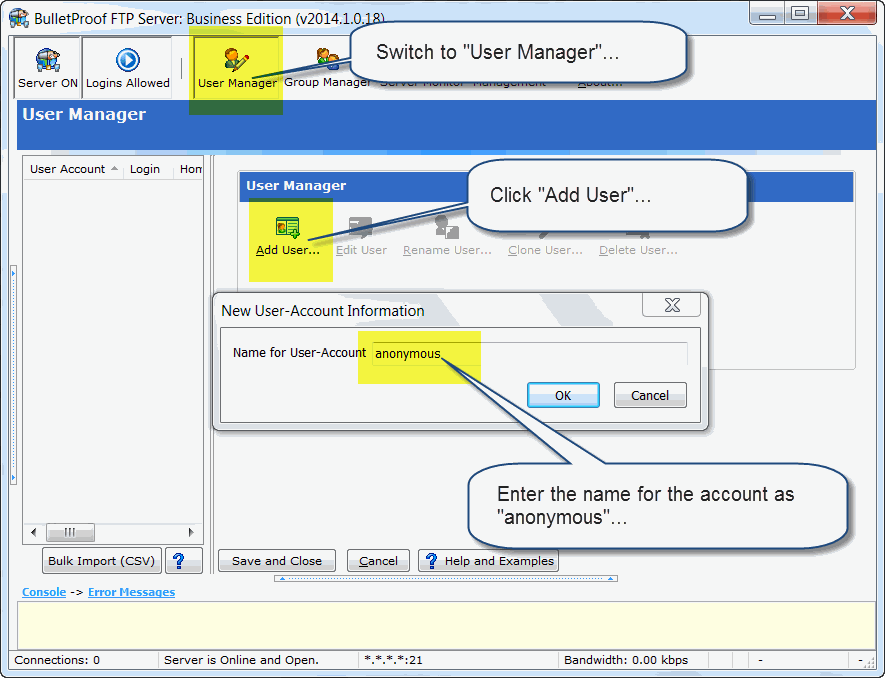
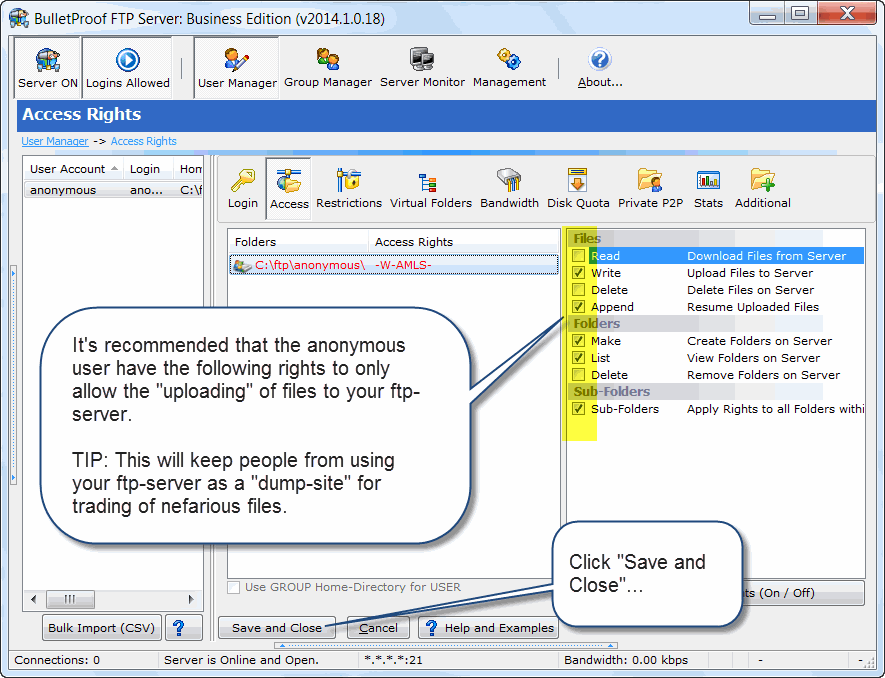
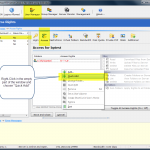
In the latest release of BulletProof FTP Server, we’ve added the ability to import users via the “Bulk Import (CSV)” button, located in the User Manager. A CSV-File is a flat-text-file that contains a list of records (one per row) with a defined set of field-values for that record. This is analogous to a spreadsheet, such as Microsoft Excel and is often used as a method of getting data in/out of a spreadsheet.

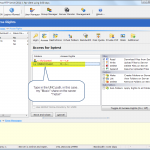
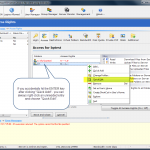
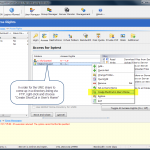
To this end, we’ve developed a function that allows you to IMPORT user-accounts from another source, using a CSV file. Below is a list of fields that are supported for import. In this list, the first record you see is “ACCOUNTNAME”, this is a MANDATORY record as it is the unique-primary-key for the data. If ACCOUNTNAME exists, the data will be updated. If not, a new user-account will be created and all of the data will be set to the provided information. All other fields are optional, but each row in the CSV-file must contain the same fields as defined in the first header-record.

NOTE: Executing this functionality can be automated from the command-line utility “bpftpserver-adduser.exe”. Please see this HOWTO for more information.

EXAMPLE:
In the following example, we are defining a CSV file to import 11 new user-accounts (mmc000 to mmc010). Below you will find the first row contains the list of columns each row/record will contain; subsequent rows contain the data for the accounts. Please note, this is generic data and in this case, I choose to make a simple list of account-names that are prefixed with “mmc” and then use a 3-digit number. The intention is to show the power and flexibility; as each user-account can be assigned their own home-directory (c:\ftp\mmc999), groups, login-name, passwords, etc.

"AccountName","ACCESSRIGHTS_PACKED","Enabled","EnableLogin","Login","EnablePass","Pass","GroupName"
"mmc000","C:\ftp\mmc000;RWDAMLSK","1","1","mmc000","1","mmc000","mmc-group-0"
"mmc001","C:\ftp\mmc001;RWDAMLSK","1","1","mmc001","1","mmc001","mmc-group-0"
"mmc002","C:\ftp\mmc002;RWDAMLSK","1","1","mmc002","1","mmc002","mmc-group-0"
"mmc003","C:\ftp\mmc003;RWDAMLSK","1","1","mmc003","1","mmc003","mmc-group-0"
"mmc004","C:\ftp\mmc004;RWDAMLSK","1","1","mmc004","1","mmc004","mmc-group-0"
"mmc005","C:\ftp\mmc005;RWDAMLSK","1","1","mmc005","1","mmc005","mmc-group-0"
"mmc006","C:\ftp\mmc006;RWDAMLSK","1","1","mmc006","1","mmc006","mmc-group-0"
"mmc007","C:\ftp\mmc007;RWDAMLSK","1","1","mmc007","1","mmc007","mmc-group-0"
"mmc008","C:\ftp\mmc008;RWDAMLSK","1","1","mmc008","1","mmc008","mmc-group-0"
"mmc009","C:\ftp\mmc009;RWDAMLSK","1","1","mmc009","1","mmc009","mmc-group-0"
"mmc010","C:\ftp\mmc010;RWDAMLSK","1","1","mmc010","1","mmc010","mmc-group-0"

SUPPORTED FIELDS AVAILABLE TO BULK-IMPORT

Commonly Used Fields

FIELD_NAME FIELD_TYPE DEFAULT MANDATORY
ACCOUNTNAME STRING “” TRUE
AccessRights_Packed STRING “”
Enabled BOOLEAN True
EnableLogin BOOLEAN True
Login STRING “”
EnablePass BOOLEAN True
Pass STRING “”
EnableGroup BOOLEAN False
GroupName STRING “”
UseGroupHomeDir BOOLEAN False

Lesser Lesser Used Fields

FIELD_NAME FIELD_TYPE DEFAULT MANDATORY
AddHomeLink BOOLEAN False
AddLinkFromFile BOOLEAN False
AddLinks BOOLEAN False
AllowChangePassword BOOLEAN False
AllowNoop BOOLEAN True
BannedFiles_PACKED STRING “”
By-Pass_MaxUser BOOLEAN False
ChgDirMsgFile STRING “”
DefaultGroupQuotaCredit INTEGER -1
DefaultGroupRatioCredit INTEGER -1
EnableMaxConPerIP BOOLEAN False
EnableMaxUsers BOOLEAN False
EnableSITECHAT BOOLEAN False
EnableSITEWHO BOOLEAN False
Hide hidden Files BOOLEAN False
Home-IP STRING “”
IPACLList_PACKED STRING “”
Info_Address STRING “”
Info_City STRING “”
Info_Email STRING “”
Info_Fax STRING “”
Info_Name STRING “”
Info_Notes STRING “”
Info_PhoneHome STRING “”
Info_PhoneWork STRING “”
LinksFile STRING “”
LoginMsgFile STRING “”
MaxConPerIP INTEGER 1
MaxSpeedEnabled BOOLEAN False
MaxSpeedRcv INTEGER 512
MaxSpeedSnd INTEGER 512
MaxUsers INTEGER 0
QuotaCurrent INTEGER 0
QuotaEnabled BOOLEAN False
QuotaMax INTEGER 0
RatioCredit INTEGER 0
RatioDown INTEGER 1
RatioEnabled BOOLEAN False
RatioMethod INTEGER 0
RatioUp INTEGER 1
RelativePath BOOLEAN False
ResolveLNK BOOLEAN True
ShowChangeDirMsg BOOLEAN False
ShowLoginMsg BOOLEAN False
TimeOutEnabled BOOLEAN True
Timeout INTEGER 600
TreatLinksAs BOOLEAN True

HOWTO: Remove Your License-Code

How to Remove License-Code

  • Start the GUI version of BulletProof FTP Server
  • Click About
  • Hold down Alt+Shift+Ctrl and Left-Click the “License for Use:” box
  • Click “YES” to “REMOVE LICENSE KEY:…” dialog-box
  • Enter the “Technical-Support Permission-Code” and click OK:
  • BulletProof FTP Server will confirm the removal and shutdown the program
  • HOWTO: Remove License Code

    The "Technical Support Permission Key" is: 902djlx0qojs
    The “Technical Support Permission Key” is:
    902djlx0qojs

    HOWTO: Enter Your Subscription-Code

    License-Codes: This HOWTO covers the entering the subscription-codes into the software. In addition, we have two other HOWTOs which may help…

    HOWTO: Upgrade Your License to a new Edition
    http://blog.builtbp.com/2014/02/upgrade-your-license-to-a-new-edition/

    HOWTO: Remove License-Code for Upgrading License
    http://blog.builtbp.com/2013/05/howto-remove-license-code-for-upgrading-license/

    HOWTO: Enter Your Subscription Code…
    Once you have purchased BulletProof FTP Server (http://bpftpserver.com), you will receive a “Subscription Code” in an email with your receipt. Once this information has been entered into the TRIAL/DEMO version of the software, installed on your computer; it will turn itself into the full-featured-retail-copy.

    HOWTO: Enter your subscription-code
    HOWTO: Enter your subscription-code

    HOWTO: Using Internet Explorer to connect to a FTP-Server

    Configuring Internet Explorer to be able to connect to BulletProof FTP Server (or any FTP Server) is very easy to do and requires the toggling of two (2) options from:

    Windows Start Button -> Control Panel -> Network & Internet -> Internet Options, click the “Advanced” tab and check “Enable FTP Folder” and “Use Passive FTP”.

    Below are screen-shots for accessing these features in Windows. Please click the small-image to view the full-image.

    HOWTO: Share a UNC Folder via FTP

    In the latest version of BulletProof FTP Server, you can also offer a UNC Share to your FTP-Clients.. even when the BPFTP Server is running as Windows System-Service!

    This posting builds upon a previous article on how to expose Drive-Letters using “Virtual Folders” in BulletProof FTP Server, by showing how to use UNC Paths as well…

    HOWTO: Using Virtual-Folders to Share Additional Drives/Folders via FTP
    http://blog.builtbp.com/2011/12/howto-using-virtual-folders-to-share-additional-drivesfolders-via-ftp/

    HOWTO: Windows System-Service. Also, please see the extended list of postings related to running BPFTP Server as a Windows System-Service:
    http://blog.builtbp.com/2011/09/howto-windows-system-service/
    http://blog.builtbp.com/category/bpftp-server/windows-system-service/

    HOWTO: Using Virtual-Folders to Share Additional Drives/Folders via FTP

    BulletProof FTP Server supports the ability to create “Virtual Folders” for your ftp-users to access additional drives, folders and network-shares; allowing your ftp-users access to a wide variety of folder-locations on your local computer, as well as mounted-shares in your network.

    Example Usage:

    • Providing Access to Web-Server documents via FTP
    • Accessing the files on your home-computer from work
    • Allowing telecommuters to update company files, spreadsheets, etc from home
    • Facilitating the transfer of very large files over the internet (too big for email)
    • Trade files between friends and family using their web-browser

    Additional Info:
    TIPS: How to serve your Network-Drives via FTP
    HOWTO: Share a UNC Folder via FTP